Best Tube Notcher for Roll Cage Builds (and Tight Fishmouth Joints)
Find the best tube notcher for roll cage work: notcher types, spec-based picks, hole saw sizing and a step-by-step guide to tight fishmouth joints.

You’ve bent your main hoop. It looks great. Now every other tube in the cage has to meet it, and each joint needs a curved “fishmouth” cut so the tubes saddle together tightly. Do that with a grinder and a lot of hope, and you get gaps you can fit a nickel in. Do it with the best tube notcher for roll cage work, and your joints close up like they grew together.
This guide does two jobs. First, it walks you through the main types of tube notcher, what each one is good at, and which models fit a garage cage build. Second, it shows you how to cut tight fishmouth joints step by step, including angled and offset notches. No jargon walls. Just what matters, why it matters, and how to do it.
One thing before we start. The notcher is only a tool. Your cage’s tube size, wall thickness, material and welding method come from your rulebook, not from us or a tool maker. Benders Hub is not a tech inspector or an engineer. Confirm every requirement with your current rulebook and your inspector before you buy tube.
For most garage cage builds in 1.5″ to 1.75″ tube, a hole-saw notcher with a 2″ tube capacity, a solid vise and an angle scale to 60° covers nearly every joint.
- Best all-round pick: Eastwood Tube & Pipe Notcher. Clamps up to 2″ round, takes hole saws up to 2-1/2″, 0°–60°.
- Budget alternative: Woodward Fab 2″ hole-saw notcher. Simple, 2″ capacity, 60° adjustment.
- Drill press option: Grizzly T28929. Mounts on a drill press for steady, repeatable feed.
- Step-up (sold direct): Pro-Tools, JD2, Rogue Fab and Baileigh notchers add offset notching, bigger capacity or wider angle ranges.
📋 In this guide
- Why tight notches matter on a cage
- Tube notcher types, explained simply
- What makes the best tube notcher for roll cage work
- Best tube notchers for cage builders
- Side-by-side comparison
- Hole saws: size, teeth and lube
- How to cut a tight fishmouth, step by step
- Angled, offset and multi-tube joints
- Real-life lessons from cage builders
- Common notching mistakes and fixes
- Pro tips for cleaner joints
- FAQ
- Your notching checklist
Why tight notches matter on a roll cage
A notch (also called a cope or fishmouth) is the curved cut on the end of a tube. It lets that tube sit snugly against the side of another round tube. Without it, round meets round at a single point, and you’d be trying to fill a crescent-shaped gap with weld.
Why does that matter so much on a cage? Three reasons:
- Weld quality. A tight joint lets the welder lay a consistent bead all the way around. Big gaps invite burn-through, cold spots and messy filler.
- Inspection. Rulebooks set standards for cage welds. SCCA Time Trials’ Safety Level 3 rules, for example, call for full-penetration welds that run continuously around the entire tubular structure (SCCA Time Trials safety rules). That’s much easier to achieve on a joint that fits.
- Geometry. A notch cut at the wrong angle or rotation pushes the brace out of position. The error stacks up through every tube that joins it.
The rulebook decides the tube. Each sanctioning body publishes its own cage rules, and they change between editions. Look up the current version for your class: the NHRA rulebook, the SCCA Time Trials safety rules, NASA’s Club Codes and Regulations, or the FIA’s Appendix J. Some rulebooks also set the welding process. NHRA’s 2019 General Regulations, for example, said 4130 chromoly tube welding must be done by TIG. Check the current wording before you plan your build.
This guide covers how to cut good notches. It doesn’t certify a cage. Some bodies don’t allow a home-built cage at all in some cases. The FIA’s Appendix J, for example, has required newly homologated cars to use a cage homologated by the FIA or a national authority, not a self-built one. Talk to your inspector before you cut any tube.

Tube notcher types, explained simply
“Tube notcher” covers several very different machines. They all make the same shape. They just remove the metal in different ways, at very different costs.
1. Hole-saw notchers (hand drill)
This is the garage standard. A frame clamps your tube in a vise. A shaft on bearings carries a regular hole saw, and you spin it with a hand drill. You set the angle by pivoting the vise or the saw head. The saw is the same size as the tube you’re joining to, so it cuts the exact curve you need. They’re compact, affordable and good enough for most cages.
2. Hole-saw notchers (drill press)
Same idea, but the notcher bolts to a drill-press table and the hole saw goes in the drill-press chuck. The press gives you a smooth, steady feed. That helps your hole saws last and keeps cuts square. The catch is height. Grizzly says its T28929 needs 14″ of clearance between chuck and table (Grizzly). JD2 also warns that a vertical setup makes angled tube tilt toward the floor, which limits the length you can notch.
3. End-mill notchers
These use a motor-driven end mill instead of a hole saw. They’re shop machines. Pro-Tools’ End Mill Notcher, for example, lists 1/2″ to 2-1/2″ OD round tube, angles from 0° to 180°, offsets up to half the tube’s OD and a 1-1/2 HP motor (Pro-Tools). It’s a big investment for a garage.
4. Abrasive belt notchers
A belt notcher grinds the fishmouth with a sanding belt wrapped around a wheel the size of the mating tube. They’re fast and leave a clean edge. Baileigh’s TN-600, for example, uses a 5 HP motor on 220 V and a 6″ × 79″ belt, and handles tube up to 3″ OD at up to 60° with optional mandrels (Baileigh). Production shops love them. Most garages don’t need one.
5. Press (punch) notchers and hand methods
Press notchers punch the notch with a die. They’re fast for one size of thin pipe, such as fence or handrail work, but each size needs its own die. Then there’s the hand method: a printed paper template wrapped around the tube, a cut-off wheel and a grinder. It works for odd one-off joints, but it’s slow and hard to repeat.
| Notcher type | How it cuts | Best for | Garage fit |
|---|---|---|---|
| Hole saw, hand drill | Hole saw on a bearing shaft | Cages, bumpers, frames | ✅ The usual choice |
| Hole saw, drill press | Hole saw in the drill-press chuck | Repeatable straight and angled notches | ✅ If you own a tall drill press |
| End mill | Motor-driven end mill | Shops doing lots of joints | ⚠️ Big investment |
| Abrasive belt | Grinding belt shaped to the mating tube | Production, clean edges | ⚠️ Shop machine, big power needs |
| Press / punch | Die punches the notch | One size of thin pipe, fast | ❌ Not for cage tube |
| Template and grinder | Hand cut to a printed template | Odd one-off joints | ⚠️ Slow, hard to repeat |
For a cage in a home garage, a hole-saw notcher is the sweet spot. The rest of this guide focuses on those.
What makes the best tube notcher for roll cage work
Most hole-saw notchers look alike in photos. The differences hide in the details. Here’s what to check, and why each one matters for cage joints.
1. Tube capacity (the tube you cut)
The vise has to hold the tube you’re notching. Most garage notchers clamp up to about 2″ OD. That covers common cage sizes like 1.5″, 1.625″ and 1.75″. Watch out for pipe. A 2″ pipe measures 2-3/8″ across the outside, so it won’t fit a 2″ notcher like the Grizzly T28929.
2. Hole-saw capacity (the tube you join to)
The hole saw matches the tube you’re joining to. So the largest hole saw the notcher takes sets the largest mating tube. The Eastwood notcher, for example, clamps tube up to 2″ but takes hole saws up to 2-1/2″. You can notch a 2″ tube to meet a 2-1/2″ tube with it.
3. Angle range and scale
Cage braces meet the hoops at all sorts of angles. A range to 50° or 60° covers most joints. Check how your scale reads, too. On many notchers, 0° is a square, 90° joint, but not all scales work that way. Allstar’s economy notcher, for example, is listed as notching from 90° down to 45°. Read your manual, and check angles with a digital angle finder.
4. Rigidity: shaft, bearings and frame
Any wobble in the shaft shows up as a sloppy notch. Look for a thick frame, a big shaft and real bearings. Pro-Tools’ Industrial (Pro+) notcher, for instance, uses a 1″ shaft on sealed ball bearings. Budget notchers draw mixed reports in forums, and some owners say play develops over time.
5. Offset notching
An offset notch joins a brace off-center on the mating tube. You need it for some cage clusters. Pro-Tools’ Industrial model offers offset up to half the tube’s OD. Its Racer model doesn’t offer offset at all.
6. Hole-saw depth
Steep angles and big tubes need deep cuts. Rogue Fab notes that standard hole saws have only about 1.5″ of depth, which limits large-diameter or steep-angle notches. Deeper saws exist for that job.
Always check both numbers: the largest tube the vise holds, and the largest hole saw the shaft takes. The first limits the tube you cut. The second limits the tube you join to.
Best tube notchers for roll cage builders
Here’s how we picked. We looked for hole-saw notchers a home builder can buy on Amazon, with published capacities that cover common cage tube. We have not run these notchers through a hands-on test. Our picks are based on manufacturer and retailer specs, checked in October 2026, plus what owners commonly report in public forums. You can read how we evaluate equipment. Listings change, so confirm specs on the product page before you order.
As an Amazon Associate I earn from qualifying purchases.
Eastwood Tube & Pipe Notcher
2″ round capacity, hole saws to 2-1/2″, 0°–60°.
Buy from AmazonEastwood Tube & Pipe Notcher: best all-round pick
Eastwood Tube and Pipe Notcher (0°–60°)
A hole-saw notcher for round tube up to 2″, with room for hole saws up to 2-1/2″.
This notcher clamps your tube and guides a standard hole saw through it at the angle you set. You can run it from a hand drill or a drill press. The listing also covers rectangular tube up to 2″ × 2-1/2″.
Who it’s for: garage builders making a roll bar or cage in 1.5″ to 1.75″ tube, plus bumpers and frames. It’s a good first notcher if you want one tool that does most joints.
Why we picked it: its published numbers line up well with cage work. The 2″ vise covers common cage sizes, and the 2-1/2″ hole-saw limit gives you headroom when joining to bigger tube.
- Round tube
- Up to 2″
- Rectangular tube
- Up to 2″ × 2-1/2″
- Angle range
- 0°–60°
- Drive
- Hand drill or drill press
- Hole saws
- Not included (up to 2-1/2″)
Why we like it
- Covers common cage tube sizes
- Hole-saw limit above its tube limit
- Works with a hand drill or a drill press
- Angle range to 60° covers most braces
Know before you buy
- Hole saws are extra
- No offset notching listed
- Bolt or clamp it down for hand-drill use
Specs from the Amazon listing. Affiliate link. See our disclosure.
Woodward Fab 2″ Hole-Saw Notcher: budget pick
Woodward Fab 2″ Pipe and Tube Hole Saw Notcher
A no-frills hole-saw notcher for tube up to 2″, with a 60° adjustment.
Woodward Fab’s notcher (part WWFSPPIPENOTCH) is a simple way into proper notching. Retail listings give a 2″ maximum OD, a 60° adjustment range and standard hole saws up to 2-1/2″. One retailer describes it as made for roll cages and frame building.
Who it’s for: builders on a tight budget doing a roll bar, a few braces or a bumper. It pairs naturally with Woodward Fab’s WFB2 bender.
Why we picked it: it covers the same tube sizes as pricier notchers. Forum reports on budget notchers are mixed, though, so check it for play before every big job.
- Tube size
- Up to 2″ OD (retail listings)
- Angle range
- 60° adjustment
- Hole saws
- Standard saws up to 2-1/2″ (retail listing)
- Drive
- Drill-driven hole saw
- Offset
- Not listed
Why we like it
- Low-cost way into hole-saw notching
- 2″ capacity covers common cage tube
- Uses standard hole saws
Know before you buy
- Specs come from retailers, and they vary a little
- Mixed owner reports on long-term slop
- No offset notching listed
Affiliate link. See our disclosure.
Grizzly T28929: drill press pick
Grizzly Industrial T28929 2″ Pipe/Tube Notcher
A drill-press notcher for tube up to 2″ OD.
If you already own a tall drill press, this notcher turns it into a steady notching station. The press feeds the hole saw smoothly, which is kind to saws and to your wrists.
Who it’s for: builders with a solid drill press who want repeatable straight and angled notches. Grizzly’s manual notes the spindle ships inverted and must be reversed before use, and it recommends bi-metal hole saws for steel (Grizzly manual).
Why we picked it: it’s a clear drill-press option with published specs. Note the angle conflict below, and check it fits under your press.
- Tube size
- Up to 2″ OD (not 2″ pipe)
- Angle range
- Grizzly lists 0°–45°; some listings say 6°–60°
- Clearance
- 14″ between chuck and table
- Chuck
- 1/2″
- Spindle threads
- 1/2″-20 and 5/8″-18
Why we like it
- Smooth, steady feed from the drill press
- Clear manual and published specs
- Good for repeat notches
Know before you buy
- Needs a tall drill press
- Smaller angle range per Grizzly’s own manual
- Long tubes get awkward on a vertical setup
Affiliate link. See our disclosure.
Step-up notchers (sold direct, not on Amazon)
If you’ll build several cages, or you want offset notching, these come up again and again in build threads. Pro-Tools makes the Racer (1/2″ to 2″ round, 0°–60°, no offset) and the Pro+ Industrial (the same capacity, plus offsets up to half the OD) (Pro-Tools). JD2’s Notchmaster takes 3/4″ to 3″ OD at angles up to 50° on a 1/2″ hand drill. Rogue Fab’s VersaNotcher lists a 225° angle range and hole saws up to 4″ (Rogue Fab). Rogue Fab has discontinued at least one finish of it, so check availability. Baileigh’s TN-250 is a radial-jaw notcher rated to 2.5″ OD (Baileigh). All are sold direct or through tool dealers.
Side-by-side comparison
Here’s how the notchers stack up on the numbers that matter for cage joints. Specs come from the maker or the retail listing. Where sources disagree, we say so.
| Notcher | Type | Round tube | Angle range | Offset | Where to buy |
|---|---|---|---|---|---|
| Eastwood Tube & Pipe Notcher | Hole saw, drill or press | Up to 2″ | 0°–60° | Not listed | Amazon |
| Woodward Fab 2″ | Hole saw | Up to 2″ | 60° adjustment | Not listed | Amazon |
| Grizzly T28929 | Hole saw, drill press | Up to 2″ | 0°–45° (Grizzly); 6°–60° in some listings | Not listed | Amazon |
| Pro-Tools Racer | Hole saw | 1/2″–2″ | 0°–60° | No | Direct from Pro-Tools |
| Pro-Tools Pro+ (Industrial) | Hole saw, drill or press | 1/2″–2″ | 0°–60° | Up to 1/2 OD | Direct from Pro-Tools |
| JD2 Notchmaster | Hole saw, hand drill | 3/4″–3″ | Up to 50° | Not stated | Direct / dealers |
| Rogue Fab VersaNotcher | Hole saw | 3/4″–2″ bent; to 2-3/8″ straight | 225° range | See maker | Direct from Rogue Fab |
| Pro-Tools End Mill Notcher | End mill, 1-1/2 HP | 1/2″–2-1/2″ | 0°–180° | Up to 1/2 OD | Direct from Pro-Tools |
How to read this table: start with round tube capacity. Every model here covers 1.5″ and 1.75″ cage tube. Next, look at the angle range against your design. Shallow braces need big angles. Then ask whether you need offsets. If your cage has clusters where three or four tubes meet, offset notching saves a lot of grinding. Finally, decide whether you’ll use a hand drill or a drill press.
Still choosing a bender for the cage itself? Our guide to the best tube bender for a roll cage covers the bending side, and our bender type comparison lays the machine types side by side.
Hole saws: size, teeth and lube
The notcher holds the tube. The hole saw does the cutting. A great notcher with the wrong saw still makes bad joints, so this part matters just as much.
Pick the size from the tube you join to
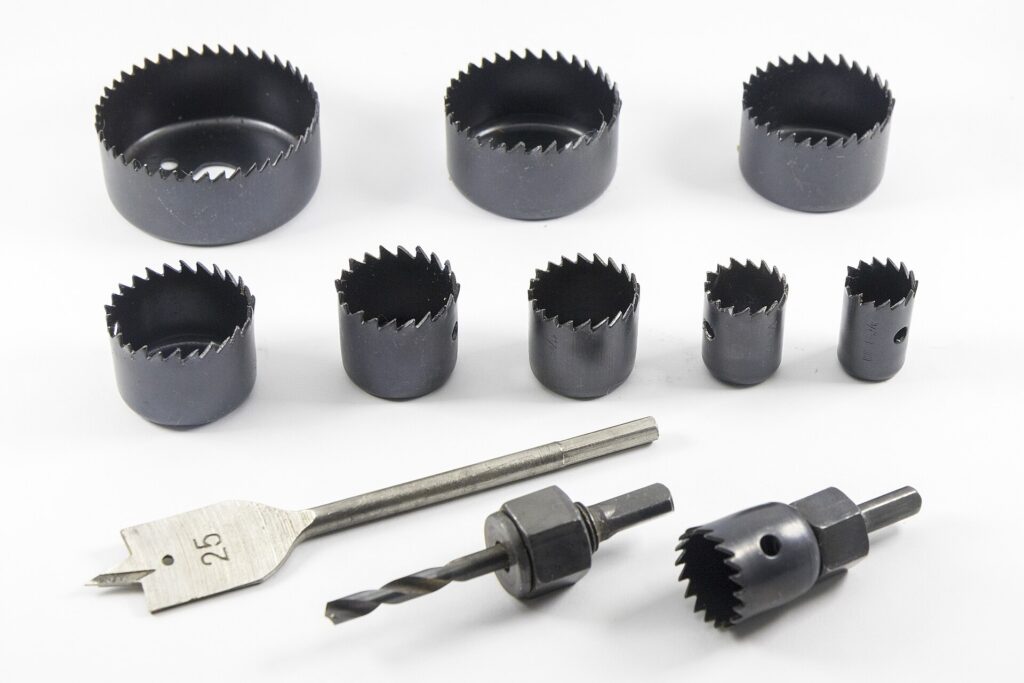
Choose a hole saw with the same diameter as the outside of the tube your notched piece will attach to. McMaster-Carr’s notcher guidance says exactly that (McMaster-Carr). If a 1.5″ brace meets a 1.75″ hoop, you need a 1-3/4″ hole saw, not a 1-1/2″ one.
| Tube you’re joining to (OD) | Hole saw size | Common use |
|---|---|---|
| 1.5″ | 1-1/2″ | Braces, bars and kart frames |
| 1.625″ | 1-5/8″ | Some cage designs |
| 1.75″ | 1-3/4″ | Main hoops and bars on many cages |
| 2″ | 2″ | Heavier frames and bumpers |
| Pipe (any size) | Measure the real OD first | 1-1/2″ pipe is 1.900″ OD, not 1.5″ |
Use bi-metal saws
Rogue Fab says bi-metal hole saws are the right choice for a portable notcher. It says carbide-tipped saws have the wrong tooth pitch for notch geometry, and their brittle tips struggle with side loads (Rogue Fab notching guide). JD2’s notcher manual and Grizzly’s manual both point to bi-metal saws too.
Match the teeth to the wall
Rogue Fab suggests fine-tooth saws (8 to 12 teeth per inch) for tube .095″ wall or thinner, and coarse tooth for anything thicker than .095″ (Rogue Fab hole saws). It also notes coarse-tooth and deep saws are a little less beginner-friendly.
Lube, speed and heat
Use cutting fluid on steel. Rogue Fab recommends a product like Tap Magic for steel and stainless, and a heavier paste for stainless. It doesn’t give a fixed RPM. Its advice for stainless is to keep speed low, slow down if the saw gets hot fast, and avoid stopping mid-cut.
A good 1-3/4″ bi-metal saw such as the LENOX 1-3/4″ bi-metal Speed Slot hole saw is a sensible first buy for 1.75″ cage tube. Check that your notcher’s arbor fits it.
How to cut a tight fishmouth, step by step
Here’s a routine that works on most hole-saw notchers. Practice on scrap first. One sacrificial piece teaches you more than any video.
- Confirm the design. Check tube size, wall and material against your rulebook. Decide where each tube meets another, and at what angle.
- Cut the tube a little long. Leave extra length. You’ll notch one end, check the fit, then mark and notch the other end in place.
- Draw a reference line. Run a straight line along the full length of the tube with a marker. It keeps both notches lined up with each other.
- Fit the right hole saw. Use the saw that matches the OD of the tube you’re joining to. Make sure it’s sharp and runs true.
- Set the angle. Set the notcher’s scale, then confirm it with a digital angle finder. Check your manual for which way the scale reads.
- Clamp the tube centered. Line up the reference line with a mark on the vise, such as straight up. Tighten the vise hard so the tube can’t spin.
- Lube and cut. Feed steadily. Let the saw cut, back out to clear chips, and add fluid as you go.
- Test the fit. Hold the tube against its mating tube. Look for light around the joint. Note where it’s tight and where it gaps.
- Mark and notch the other end. Hold the tube in place on the cage, mark the length, and notch the second end with the reference line in the same position.
- Deburr and clean. File off burrs inside and out. Clean the joint area before welding.
How tight is tight enough? There’s no single gap number that suits every welder and process. Aim for a joint where light barely shows. Then ask your welder, and check your rulebook’s weld standards.
A hole saw can catch and wrench a hand drill hard. Clamp the notcher to a solid bench, use a drill with a side handle, keep your hands out of the swing, and wear eye protection. Read our workshop safety notes before your first cut.
A good notch isn’t about the tool. It’s about the right hole saw, a locked-down tube and a reference line that never moves.
Angled, offset and multi-tube joints
Square joints are easy. Cage joints rarely are. Diagonals, door bars and harness bars meet hoops at angles, and some tubes meet two others at once.
Angled notches
For an angled joint, you set the cope angle on the notcher. That’s how far the joint is from square. A brace that meets a hoop at 60° needs a 30° notch, because it’s 30° from square. Get this backwards and the notch won’t come close. If your notcher’s scale reads 0° for a square joint, set it to the difference from 90°.
Rogue Fab’s guide shows a simple way to mark an angled notch by eye. Lay the tube over its mating tube at the right angle. Mark where the edges cross, and draw the centerline across. Those marks show you the depth and the angle (Rogue Fab).
Offset notches
An offset notch puts the saw off-center, so the brace lands to one side of the mating tube. Some notchers have an offset adjustment. Pro-Tools’ Industrial model allows offsets up to half the tube’s OD. Without that feature, you’d shim the tube or finish by hand.
Notch phase: keeping both ends lined up
A brace has two ends. The notches on each end have to face the right way relative to each other. This is called phase or clocking. If the tube rotates in the vise between notches, the second notch lands twisted. That’s why the reference line matters. Our guide to tube bend rotation and twist covers the same idea for bends.
Clusters and templates
Where three or four tubes meet, notch the first tube to the hoop, tack it, then notch the next tube to fit both. For very odd joints, a free online pipe-notch template generator can print a full-size wrap-around template. Cut close with a cut-off wheel, then finish with a grinder.
Use our geometry visualizer and bend calculator to plan bends and lengths before you cut, then read how to lay out tube bends.
Real-life lessons from cage builders
These are composite stories. The same situations come up again and again in garage-fab forums and build threads. Each one costs tube and time, so learn from them now.
A builder notches a 1.5″ diagonal to meet a 1.75″ main hoop. They grab the 1-1/2″ hole saw because “it’s a 1.5-inch tube.” The notch is too tight in the middle and gaps at the sides. Two braces later, they figure it out.
Lesson: size the saw to the tube you join to, not the tube you’re cutting.
Someone notches one end of a door bar, then loosens the vise to flip the tube. It rotates a few degrees. The second notch lands out of phase, and the bar won’t sit flat against both hoops.
Lesson: draw a reference line and line it up with the same vise mark for every notch.
A builder sets a 30° notch by the scale and the brace won’t sit right. A digital angle finder shows the scale is off by a couple of degrees. Owner reviews of some budget notchers mention exactly this.
Lesson: trust the angle finder, not the casting marks.
Common notching mistakes (and how to fix them)
Most bad joints come from a short list of mistakes. Here they are, with the fix for each.
❌ Using the wrong size hole saw. The saw matches the tube being cut, not the mating tube.
✅ Fix: measure the OD of the tube you’re joining to and use that size saw.
❌ Trusting the angle scale blindly. Cast scales can be off, and they don’t all read the same way.
✅ Fix: read the manual, then verify with a digital angle finder.
❌ Letting the tube rotate between notches. The second notch lands out of phase.
✅ Fix: draw a reference line and match it to the same vise mark every time.
❌ Cutting dry with a dull saw. The saw overheats, wanders and wears out fast.
✅ Fix: use sharp bi-metal saws and cutting fluid, and slow down if the saw gets hot.
❌ Cutting to final length before notching. One bad notch and the tube is too short.
✅ Fix: cut long, notch one end, then mark the second end in place on the cage.
❌ Filling gaps with weld. Big gaps make weak, messy joints that may not pass inspection.
✅ Fix: re-cut the tube. Notching scrap is cheaper than a failed tech check.
❌ Running a hand-drill notcher loose on the floor. The saw grabs and the drill twists hard.
✅ Fix: clamp the notcher to a bench, use a side handle and keep a firm stance.
Pro tips for cleaner cage joints
These habits separate tidy cages from “good enough.” None of them cost much. All of them pay off on inspection day.
- 💡 Keep one saw per tube size. Label them. A worn saw cuts oversize and wanders, so retire it before it ruins a brace.
- 💡 Notch the scrap first. Before every new angle, cut a short scrap and test it on the real tube.
- 💡 Use deep saws for steep angles. Standard saws run out of depth on shallow braces and big tube.
- 💡 Mark the long side. Write “L” on the long point of each notch. It helps you clamp the second end the right way round.
- 💡 Tack, check, then weld. Tack the whole cage first. Check measurements and fit, then weld it out.
- 💡 Deburr inside and out. Burrs hold the tube away from the mating tube and spoil the fit.
- 💡 Respect the rules. Read your current rulebook before you buy tube. See our roll cage specifications overview and how to build a roll cage, then talk to your inspector.
Experienced builders notch the big structure first: main hoop, then front hoop or down bars, then the braces that tie them together. Each new tube gets notched to fit what’s already tacked in place.
Cut long, notch one end, then mark the other end in place. That one habit saves more tube than any notcher upgrade.
Frequently asked questions
What is the best tube notcher for roll cage work?
For most garage builds, a hole-saw notcher with a 2″ tube capacity and an angle range to 50° or 60°. The Eastwood notcher is our all-round pick. The Woodward Fab is a budget option. For offsets, look at Pro-Tools’ Industrial model.
What size hole saw do I use to notch tube?
Use a hole saw the same diameter as the outside of the tube you’re joining to. For a brace meeting a 1.75″ hoop, use a 1-3/4″ saw.
Are carbide hole saws better for notching?
Not for most portable notchers. Rogue Fab says bi-metal saws are the right choice, and that carbide tips are brittle under side loads. JD2 and Grizzly also point to bi-metal saws.
Can I use a drill press with a tube notcher?
Some notchers are made for it, like the Grizzly T28929, which needs 14″ between chuck and table. JD2 advises against vertical mounting for its TN-100, because angled tube tilts toward the floor.
Does my rulebook say how to notch cage tube?
Rulebooks set tube size, wall, material and weld standards. SCCA Time Trials, for example, calls for full-penetration welds that run continuously around the structure. Read your current rulebook and ask your inspector.
How do I notch a tube at an angle?
On a scale where 0° is square, set the notcher to how far the joint is from square. A brace meeting a hoop at 60° needs a 30° setting. Check the setting with a digital angle finder and test on scrap first.
Your notching checklist
Run through this list before you cut your first cage tube. If you can tick every box, you’re ready.
- I’ve confirmed tube size, wall, material and welding method in my current rulebook
- I’ve talked to my tech inspector about my cage plan
- My notcher clamps my tube size and takes the hole saws I need
- The angle range covers my shallowest brace
- I have a sharp bi-metal hole saw for each mating tube size
- I have cutting fluid and a digital angle finder
- The notcher is clamped or bolted to a solid bench or press
- Every tube has a reference line drawn along it
- I cut tube long and mark the second notch in place
- I test each new angle on scrap first
That’s it. Pick a notcher that fits your tube, match the saw to the mating tube, lock the tube down and keep that reference line lined up. Do that, and your cage joints will fit tight enough to make your welder smile. ✅
Planning the bends that go with your notches?
Work out tangent, arc and cut lengths in seconds, or see your bend geometry before you cut.
Keep reading
Best Exhaust Pipe Bender for Home Garage Builds (2026)
Looking for the best exhaust pipe bender for home garage builds? Compare crush benders, mandrel benders and pre-bent mandrel bends, with sourced…
Tube Bender Die Compatibility: What Fits What, Brand by Brand
Tube bender die compatibility, brand by brand: which dies makers say fit, which don't, pin sizes, and why cross-brand fit stays unknown…
How to Choose a Tube Bender: A 10-Step Buying Guide
How to choose a tube bender in 10 steps: match capacity, CLR, dies, drive and floor mounting to your projects, with worksheets…