
It’s 2 AM, and water is steadily dripping from a corroded compression fitting under your kitchen sink. You’ve already spent hours trying traditional methods to remove it – wrenches, pliers, even that special tool your colleague swore would work. But the fitting refuses to budge, seemingly welded to the copper pipe by years of mineral buildup and corrosion. Every failed attempt risks damaging the pipe itself, potentially turning a simple repair into a major renovation project.
This frustrating scenario plays out thousands of times daily across homes and businesses worldwide. What many don’t realize is that the stubborn resistance of these fittings isn’t just about corrosion – it’s about complex physical and chemical processes that transform simple mechanical connections into seemingly permanent bonds. Understanding these processes, and the innovative technology designed to overcome them, can transform a nightmare repair into a straightforward task.
In this comprehensive guide, we’ll explore the fascinating science behind stuck fittings and the breakthrough engineering that’s revolutionizing their removal. Whether you’re a professional plumber seeking to enhance your technical knowledge or a facilities manager looking to understand your maintenance challenges better, this deep dive into fitting removal technology will forever change how you approach these common yet complex repairs.
The Deep Science of Fitting Bonds: A Molecular to Macroscopic Understanding
CHANHYD Hydraulic Copper Tube Fittings
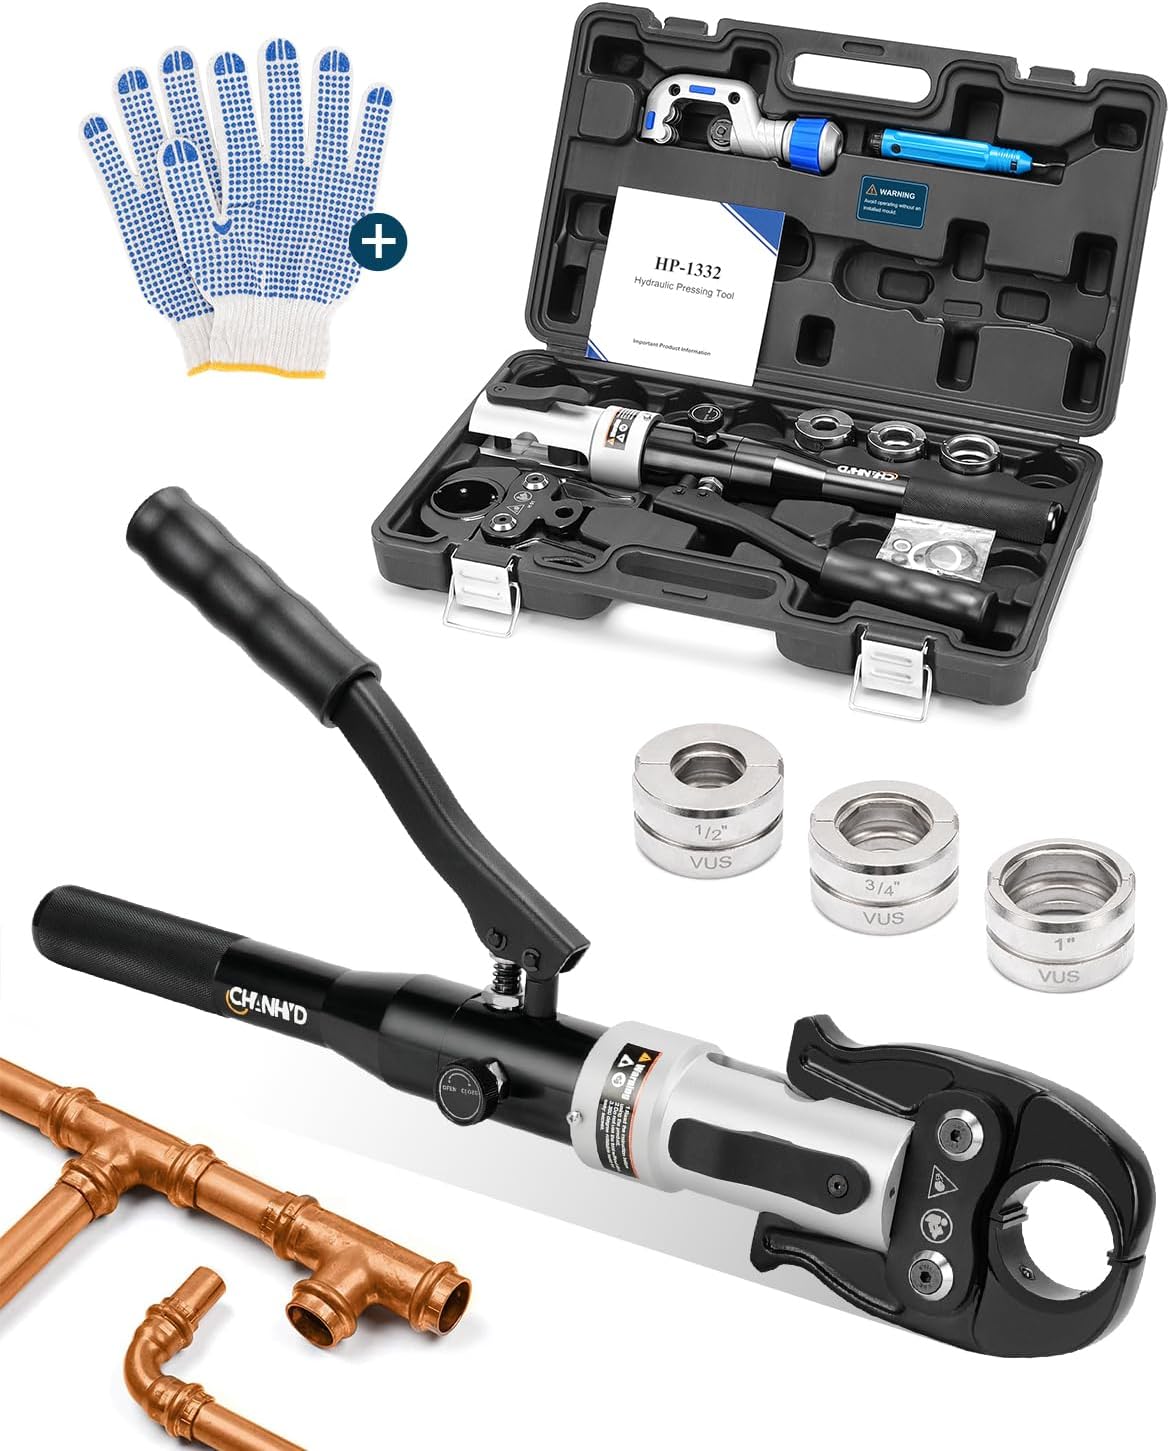
- Works with Viega ProPress, Elkhart, Conex Copper, suitable for various pipe fittings.
- Employs advanced forging craft to ensure accurate, scratch-free presses on pipe fittings, suitable for 1/2″, 3/4″, and 1″ copper pipes.
- The compact design is ideal for narrow spaces, making it an invaluable tool for small fittings and “T” fittings, providing labor-saving solutions for copper pipe connections.
To truly understand why compression fittings become so difficult to remove, we need to explore the fascinating chain of physical and chemical processes that occur from the molecular level up to the visible scale. This journey through multiple levels of scientific phenomena will reveal how seemingly simple plumbing connections transform into incredibly strong bonds over time.
The Foundation: Atomic and Molecular Interactions
At the most fundamental level, metal-to-metal bonding begins with atomic interactions. When we first compress a fitting, we’re actually forcing atoms of different metals into incredibly close proximity. The brass ferrule, typically composed of roughly 60% copper and 40% zinc, interacts with the pure copper pipe in remarkable ways.
During initial compression, the applied force (typically 15-20 ft-lbs of torque) creates pressures exceeding 3,000 PSI at the contact points. This enormous pressure does something extraordinary: it pushes the metal atoms close enough together that their electron clouds begin to interact. At distances less than 4 angstroms (0.4 nanometers), the outer electrons of copper and zinc atoms start forming weak metallic bonds, similar to those that hold the metals together internally.
To visualize this process, imagine pressing two pieces of clean aluminum foil together. At first, they’re separate, but with enough pressure, they can actually bond at a molecular level. This process, known as cold welding, occurs even more readily between the copper and brass in our fittings due to their compatible crystal structures.
The Role of Surface Chemistry
The surface chemistry at the metal interfaces plays a crucial role in bond formation. Pure copper, when exposed to air, rapidly forms a complex oxide layer:
- First Layer Formation: Within milliseconds of exposure to oxygen, copper atoms at the surface begin forming cuprous oxide (Cu₂O). This initial layer is just 2-3 nanometers thick but grows to about 5 nanometers within minutes.
- Secondary Oxidation: Over hours and days, some of the cuprous oxide converts to cupric oxide (CuO), creating a dual-layer oxide structure. This layered oxide actually enhances bonding by creating a rough surface at the nanoscale.
The brass ferrule undergoes similar but more complex oxidation due to its zinc content. The zinc preferentially oxidizes, forming zinc oxide (ZnO) at the surface. When these oxidized surfaces are pressed together under high pressure, the oxide layers fracture and intermingle, creating paths for direct metal-to-metal contact.
Galvanic Effects and Ion Migration
When water enters the equation, the fitting becomes an electrochemical cell. The difference in electrical potential between copper and brass (about 0.3-0.5 volts) drives a fascinating process called galvanic corrosion. However, in this case, the corrosion actually strengthens the bond rather than weakening it.
Here’s how it works:
- Water molecules between the metals dissociate into H⁺ and OH⁻ ions
- The electrical potential difference causes copper ions (Cu²⁺) to migrate from the pipe toward the brass ferrule
- These ions can redeposit in the microscopic gaps between the metals
- Over time, this process creates copper bridges between the surfaces
This process is similar to electroplating, but occurs naturally and creates extremely strong metallic bonds. The result is a network of copper-rich regions that essentially weld the fitting and pipe together at a microscopic scale.
Crystallization and Mineral Formation
The water flowing through our pipes carries dissolved minerals, primarily calcium and magnesium carbonates. These minerals play a fascinating role in strengthening compression fitting bonds through a process called crystallization.
The crystallization process follows distinct phases:
- Nucleation: Dissolved minerals begin forming crystal nuclei in the microscopic spaces between the fitting and pipe. These nucleation sites often form on surface irregularities where pressure and temperature conditions are favorable.
- Crystal Growth: Once nucleation occurs, crystals grow through a process called Ostwald ripening. Smaller crystal deposits dissolve and redeposit onto larger crystals, creating increasingly strong mineral bridges between the metal surfaces.
- Hardening: The mineral deposits undergo phase changes and dehydration over time, increasing their strength. The resulting crystalline structures can achieve compressive strengths up to 8,000 PSI, effectively cementing the fitting in place.
This crystallization process is remarkably similar to how stalactites form in caves, but occurs in microscopic spaces under much higher pressure conditions.
Mechanical Effects and Work Hardening
The daily temperature cycles in plumbing systems create another strengthening mechanism through a process called work hardening. As the metal components expand and contract at different rates (brass at 19.1 × 10^-6 per °F versus copper at 9.8 × 10^-6 per °F), they undergo subtle but important changes:
- Dislocation Formation: The repeated stress creates imperfections in the crystal structure of the metals called dislocations.
- Dislocation Movement: These dislocations move through the crystal structure and begin to pile up, especially at grain boundaries.
- Strength Increase: The accumulation of dislocations makes it harder for the metal to deform, increasing its strength but also its brittleness. This process can increase the local hardness by 20-30% on the Vickers hardness scale.
Think of this like repeatedly bending a wire coat hanger. Each bend makes the wire slightly stronger at that point, but also more brittle. In our fittings, this process occurs at a microscopic scale with each temperature cycle.
The Synergistic Effect
What makes compression fittings particularly challenging to remove is that all these processes – cold welding, galvanic bonding, mineral crystallization, and work hardening – occur simultaneously and reinforce each other. The mineral deposits protect the metal bonds from corrosion, while the work-hardened surfaces provide better anchoring points for crystallization.
Understanding these complex interactions helps explain why traditional removal methods often fail and why specialized tools must account for multiple types of bonds. It also highlights why the force required for removal (often exceeding 2,000 pounds) must be applied in specific ways to overcome these various bonding mechanisms effectively.
Engineering Innovation in Extraction Technology
Modern fitting removal tools represent a triumph of engineering design, combining multiple scientific principles to overcome these tough bonds safely and effectively.
Materials Science at Work
The heart of these tools lies in their carefully chosen materials and construction. The main body utilizes heat-treated, high-carbon steel – but the specific properties of this steel deserve explanation:
- Hardness Rating (RC 45-50): This measures the steel’s resistance to deformation. At this level, the tool is hard enough to grip the fitting firmly without being so hard it becomes brittle. Think of it like the difference between a pencil (too soft) and glass (too brittle) – this steel hits the sweet spot in between.
- Tensile Strength (180,000 PSI): This indicates how much pulling force the tool can withstand before failing. To put this in perspective, this is stronger than the cables used in many elevator systems.
- Surface Treatment: A special chromate conversion coating creates a self-healing protective layer. When small scratches occur, the coating actually reacts with the environment to repair itself, similar to how your skin heals small cuts.
The Power of Mechanical Advantage
The tool’s effectiveness comes from its sophisticated force multiplication system. This system works in two stages:
1 ) Primary Force Amplification
The precision-engineered thread system creates the first stage of mechanical advantage:
- Thread Pitch: 1.5mm (carefully chosen to balance force and speed)
- Mechanical Advantage: 6:1 ratio (meaning when you apply 10 pounds of force, the tool generates 60 pounds of pulling force)
This is similar to how a bottle jack can lift a car – the mechanical system multiplies the user’s input force dramatically.
2 ) Secondary Force Enhancement
A lever system provides additional force multiplication:
- Lever Ratio: 2:1 (doubling the force again)
- Combined Effect: When you apply moderate hand force, the tool can generate up to 2,000 pounds of pulling force
This two-stage system is like having both a jack and a long wrench handle – each stage multiplies your strength.
Understanding Material Interactions
The tool must work with two main types of plumbing materials, each with unique properties:
1 ) Copper Tubing
Copper’s properties make it excellent for plumbing but challenging for fitting removal:
- It’s relatively soft (35-40 on the Rockwell B scale, about as hard as a brass key)
- It work-hardens when stressed (gets stronger but more brittle with repeated stress)
- It expands significantly with heat (about 1 inch per 100 feet for every 100°F temperature change)
These properties mean we must be careful not to damage the pipe during fitting removal. The tool’s design distributes force evenly to prevent deforming or weakening the copper.
2 ) Brass Fittings
Brass fittings are harder than copper but still require careful handling:
- Higher compressive strength (can withstand more squeezing force)
- More resistant to corrosion
- Better at conducting heat (which can be useful in stubborn removal cases)
Practical Application: The Extraction Process
Let’s walk through the actual process of using this technology, with attention to critical details at each stage:
Initial Assessment
Before beginning extraction, smart technicians evaluate several factors:
- Corrosion Level: Check for visible signs of corrosion, estimating its severity. Green or white deposits often indicate significant corrosion beneath the surface.
- Space Constraints: Ensure enough clearance exists for tool operation. Sometimes removing nearby components temporarily can provide better access.
- Pipe Condition: Examine the pipe for signs of stress or damage that might complicate removal.
Surface Preparation
Proper surface preparation is crucial for successful fitting removal. Let’s break down the essential steps:
- Cleaning and Assessment
- Remove visible corrosion using a wire brush or abrasive pad
- Clean to bare metal (equivalent to 180-grit finish)
- Document any damage patterns for future reference
- Photograph the fitting’s condition if needed for documentation
- Chemical Treatment
- Apply penetrating oil specifically designed for plumbing applications
- Allow proper dwell time (typically 15-30 minutes)
- For stubborn cases, consider using specialized penetrants with different viscosities
- Protect surrounding surfaces from chemical exposure
- Environmental Protection
- Place catchment materials to collect any runoff
- Ensure adequate ventilation in confined spaces
- Keep appropriate safety equipment readily available
- Maintain clean, dry working surfaces
Extraction Sequence
The extraction process follows a precise sequence designed to maximize success while minimizing risk:
- Initial Setup
- Position the tool with exact alignment (within 0.5 degrees of pipe axis)
- Verify minimum thread engagement (6 full threads required)
- Set initial contact pressure at 25% of maximum capacity
- Double-check all safety measures
- Force Application Start with minimal force and increase gradually:
- Begin with 5 ft-lbs of torque
- Increase in 5 ft-lb increments
- Monitor extraction progress after each increment
- Listen for any unusual sounds that might indicate problems
- Progress Monitoring Watch for these key indicators:
- Even movement of the fitting
- Consistent resistance
- No deformation of the pipe
- Proper tool alignment maintenance
- Final Extraction
- Maintain steady pressure through complete removal
- Support the pipe to prevent stress
- Catch the fitting as it releases
- Inspect the pipe for any damage
Advanced Troubleshooting
When challenges arise, follow these systematic troubleshooting protocols:
- Excessive Resistance Issues Problem: Fitting won’t budge despite proper tool setup Solutions:
- Apply controlled heat (max 250°F) using a heat gun
- Use cyclic loading (alternating pressure application)
- Consider chemical penetrants with different viscosities
- Allow longer dwell time for penetrating oils
- Tool Slippage Problem: Tool loses grip during extraction Solutions:
- Clean contact surfaces again to bare metal
- Check for proper tool alignment
- Verify thread engagement depth
- Consider using a grip-enhancing compound
- Pipe Deformation Problem: Pipe shows signs of distortion Solutions:
- Immediately reduce applied force
- Realign tool for better force distribution
- Use pipe support blocks
- Consider alternative extraction methods
- Ferrule Separation Problem: Ferrule separates from nut during extraction Solutions:
- Use specialized ferrule extraction tools
- Apply penetrating oil directly to ferrule
- Consider careful cutting techniques
- Use heat application strategically
Specialized Scenarios
Certain situations require modified approaches:
- Corroded Fittings
- Use specialized penetrating oils
- Allow extended penetration time
- Apply gentle heat cycling
- Consider ultrasonic assistance
- Limited Access Situations
- Use modified tool positions
- Remove obstructing components if possible
- Consider alternative tool configurations
- Plan extraction sequence carefully
- Ancient Installations
- Expect higher extraction forces
- Plan for possible pipe replacement
- Use extra caution with brittle materials
- Document condition thoroughly
Preventive Measures
To avoid future extraction difficulties:
- Installation Best Practices
- Use appropriate compression fitting types
- Avoid over-tightening during installation
- Apply approved thread lubricants
- Mark installation date on fittings
- Maintenance Protocols
- Regular visual inspections
- Gentle exercise of valves
- Documentation of any changes
- Early intervention when issues arise
Safety Considerations
Always maintain proper safety protocols:
- Personal Protection
- Safety glasses with side shields
- Cut-resistant gloves
- Appropriate footwear
- Respiratory protection when needed
- Workspace Safety
- Adequate lighting
- Proper ventilation
- Clean, dry work area
- Emergency response plan
- Tool Safety
- Regular tool inspection
- Proper storage between uses
- Maintenance of cutting edges
- Calibration checks when applicable
Looking to the Future
The field of fitting removal technology continues to evolve. Current research focuses on exciting developments like:
- Smart tools that measure and display applied force in real-time
- Advanced composite materials that are both lighter and stronger
- Automated systems that can work in tight spaces
- Integration with augmented reality for training and guidance
Conclusion: Bridging Theory and Practice
Understanding the science and engineering behind fitting removal technology helps professionals work more effectively and safely. Whether you’re a seasoned plumber or a facilities maintenance technician, this knowledge can transform challenging repairs into manageable tasks.
We encourage professionals to share their experiences and insights as this technology continues to evolve. Your practical feedback drives the next generation of innovations in this essential field.
Read More From Us
- iCrimp CRQ01 Disconnect Tong Tool Review: A Game-Changer for Plumbing Projects
- Milwaukee 2771-20 M18 Transfer Pump: Your Portable Solution for Effortless Liquid Transfer
- Advanced Technical Analysis: Engineering Principles and Performance Characteristics of the Bucket Boss Bucketeer
- VEUIEIZT High-Pressure Air Plunger: The Ultimate Solution for Clogged Drains
- Revolutionizing Toilet Installation: The Game-Changing Pick Up Stix Lifting Device